Beginners' Introduction to TeX and its
Use
by
Eric Schechter,
version of
13 Oct 2005
This page is intended only to give a very
brief overview of Latex, but it includes links
to more information; you can choose which
of those links you need to follow.
Some of this page assumes you're using
Windows, but much of this
page is platform-independent -- i.e.,
applying equally well to Unix, Macintosh, and other operating systems. Readers of this page may also be interested in
our web pages about
free TeX software available for Windows computers
and
how
to use TeX on our department's Unix computers.
Outline of this page:
What is (La)TeX?
TeX -- in its various flavors, including LaTeX (explained below) --
is a typesetting language. It is used to
prepare documents -- e.g., to prepare a Ph.D. thesis or other book,
or an article that is submitted for publication in a research
journal. If used properly, it produces beautiful documents.
Originally it was used only for documents that were
printed on paper, but nowadays it is also widely used
to produce PDF files that can be viewed on computer screens.
Tex is the standard
language used by nearly all mathematicians nowadays. It
is also used extensively by scholars and writers in many other
fields -- chemistry, linguistics, chess, music -- anything that
requires precise spacing and/or unusual fonts and/or
the convenience of automatic cross-referencing.
If you are at the beginning or middle of a career involving
writing of any of those kinds, you should begin to learn
TeX as soon as possible. Learning all of TeX would
be a lifelong task -- it has grown over the decades, as many of
its users have contributed to it -- but you can learn
enough to write short and simple documents within
a few hours or days.
Some of the basic terminology is confusing, because
some of the basic terms are often used interchangeably.
Out of laziness, people tend to just use the term "tex" for
whichever of the following flavors is their favorite.
- Plain TeX, originally just called "TeX", is
the original version, created by Donald Knuth.
It is pronounced
by many people as "teks", because that's what it looks like;
but Knuth intended it to be pronounced "tek" (as in
"technology", the "x" is a Greek chi, not a latin eks.) Both
pronunciations are accepted by most people nowadays.
Knuth also played around with capitalizing the last
letter -- I'm not sure why, maybe just for fun. This
habit has persisted in other flavors (see below), but the
literature is not consistent in its use of capitals, nor will
I bother to be in this document. The terms "TeX", "Tex",
and "tex" all mean exactly the same thing; similarly for
capitalizations in
the other flavors below.
- AMS-TeX was a modified version of plain tex,
with additional commands and fonts to better suit the needs of mathematicians.
- LaTeX was a modified version of plain tex,
created by Leslie Lamport, which is in some sense more
logically and flexibly structured and easier to adapt to
different purposes through the addition of "packages".
- AMS-LaTeX was a combination of AMS-TeX and
LaTeX which was used by a few people for a while.
- There are probably a few other flavors of tex that I haven't listed here.
("Flavors" should not be confused
with "distributions." For instance, sb-tex, emtex, Miktex, and
xemtex are four distributions of tex for Windows; each of these
distributions contains its own implementation of one or more of the
flavors listed above.)
In recent years,
Latex has become the dominant flavor, because of its flexibility.
It subsumes the other flavors. For instance,
if you include in your latex file the line
\usepackage{amscls,amsmath}
then you get most of the capabilities and commands introduced
in AMS-tex and AMS-Latex.
Thus, in recent years, Latex has become the standard.
The other flavors are still used by some old-timers who haven't
bothered to learn a new system, but I believe their numbers
are diminishing faster than they are being replaced by new users.
I would not recommend that you learn any of the other flavors,
except possibly if you need to study some old documents or
work with one of those old-timers.
Throughout the rest of this document the term "tex" will mean Latex.
TeX is for typesetting, but how does it work?
It is a
markup language, like HTML -- as opposed to a
plain text document or a formatted word-processor document.
Those terms are explained below.
- Plain text documents are documents with
no boldface, italics, symbols, or other fancy features. They have
very plain, ordinary text,
like this
They can be edited with text editors such as
Emacs, VI, Windows Notepad, MS-DOS Edit, Pico, etc.
Plain text files are sometimes known as ASCII files. (That
stands for
"American Standard Code for Information Interchange.")
For example, on Windows computers, look for the
file
"C:\WINDOWS\SYSTEM32\EULA.TXT". If you
double-click on it, it will start up Notepad.
(Your Windows computer also contains many text files
with the file ending "INI", but you should not edit those
unless you really know what you are doing -- those are
program initialization files, and if you mess them up
your programs, (or even your operating system, won't work.
If you want to look at those in Notepad, why don't you make duplicate
copies and look at the duplicates instead.)
- Formatted word-processors are programs like
Word, Wordperfect, Wordpad, and Open Office (that last one is free, by the way).
Their documents may include
italics, boldface, underlining,
changes of font size
or font
face,
changes of color,
and other fancy formatting features. These features are
built into the document file using special "invisible" characters
that are seen by the program but not by the user of the program.
For instance, the file may contain a special character or string
of characters that means "begin boldface here," and another string
that means "end boldface here".
The "invisible" characters can sometimes
be revealed (for instance, in Wordperfect, use the "reveal codes" command).
But most of the time, all you see is
the consequences of those invisible characters; you can't see
what's actually in your file.
The "invisible characters" can cause problems when you're
using a formatted word-processor. For instance,
if you delete all the letters between a "begin boldface" marker
and an "end boldface" marker, those markers might still remain in your
file, and they may cause subsequently added text to malfunction.
The invisible characters can cause even bigger problems in
a file that is supposed to be just plain text.
Word-processors are also known as
WYSIWYG's ("What You See Is What You Get") because the display
on the computer screen is essentially the same as what the
resulting printout will look like.
Thus, the effect of your changes
is seen instantly when you change your file;
there is no waiting to
see whether you're getting the desired effect.
This makes word-processors the preferred tool of secretaries
and perhaps administrators, but such WYSIWYG programs
can only achieve second-rate typesetting of long and/or mathematical
documents.
- Markup languages encode the formatting
instructions in special strings of plain text. When you first
write a markup language document, you do it in a plain
text editor, but it looks like some sort of secret code
or foreign language, somewhat analogous
to the Wordperfect document with its "reveal codes"
command turned on. Then you send that file through
another program (not an editor, but a "compiler" or
"interpreter"), and it generates the readable image
that you intended.
What You See (during editing) Is not What You Get (in the
final printout). Following are
some simple examples.
|
tex |
html |
| source code |
mybook.tex (as shown in
text editor, such as Notepad):
This example shows how to do
{\bf boldface}, {\em italics},
{\color{red}different}
{\color{blue}colors}, and
mathematical expressions
such as
$y^3\alpha_x \to
\beta$.
|
mywebpage.htm (as
shown in text editor, such as Notepad):
This example shows how to do
<B>boldface</B>,
<I>italics</I>,
<FONT color="red">different</FONT>
<FONT color="blue">colors</FONT>,
and mathematical expressions such as
<nobr>y<SUP>3</SUP><FONT face=Symbol>a</FONT><SUB>x</SUB> <font face=symbol>®</font>
<FONT face=Symbol>b</FONT>.</nobr>
|
| tex file compiled to dvi pdf,
or ps file | htm or html file is
interpreted; no additional document file needed |
| output display |
mybook.dvi, mybook.pdf, or
mybook.ps (as shown in viewer, such as Yap, Acrobat Reader, or Gsview):
![[picture of tex output]](markup1.gif)
|
mywebpage.htm
(as shown in browser, such as Netscape):
This example shows how to do boldface,
italics,
different
colors,
and mathematical expressions such as
y3ax ®
b.
|
Of course, latex includes many other commands that are not available in HTML -- for square roots,
fractions, matrices, and many more symbols.
Markup languages such as TeX serve the needs of mathematicians far better
than do WYSIWYG documents such as Word or Wordperfect. That's because
the control is entirely conscious, instead of hidden away in some unrevealed codes.
You can read about the advantages of markup languages in
this rant
by Allin Cottrell.
By the way, you should NOT use a word-processor (such as Word or Wordperfect)
to edit a markup language source file (such as mybook.tex or mywebpage.htm). If you
do use one, it may leave behind some "invisible characters" that will cause the
compiler or interpreter to malfunction. You must use a plain text editor such as Notepad
-- or better yet, a souped-up plain text editor, such as one of the shell
programs discussed below.
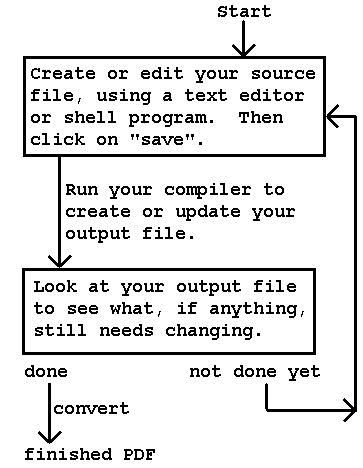
The editing cycle
If you want to make any changes in a markup document,
you don't edit the finished image. Rather, you go back
and edit the plain text source code. Then you
send it through the compiler or interpreter again.
You repeat this process as many times as necessary.
The diagram at right is intended to emphasize the
separateness of editing the source and looking at the output.
The separateness was
even greater in the early days of tex, when previewers were not available,
and the only way to see the output was to print it out on paper.
Moreover, the computer was slow, so running the compiler took
many seconds -- perhaps even minutes, if the document was large. Going to
fetch your output took additional time,
if the only suitable printer was in a
different room or perhaps even a
different building. Thus,
each cycle took a substantial amount of time.
Using the printer may have
been expensive, so you were
encouraged to do as much as
possible in each cycle. You tried to
keep the writing process down to just a
few cycles; perhaps your first rough
draft would even be written by hand in pencil.
But faster computers and
the availability of previewers
have greatly accelerated
the cycle.
Typically you may display the editor and
the previewer simultaneously on different parts of the
same computer screen.
You look at the output while editing the source file.
Each run of the compiler
and update of the previewer takes
less than a second (or only a few
seconds, for long documents),
and it costs
nothing. The different
parts of the process seem to be
happening almost simultaneously.
Typically, you may repeat this cycle hundreds
or thousands of times while writing a document.
Speaking, this arrangement still
is not WYSIWYG. If you have editor and previewer showing
simultaneously on different parts of the computer screen,
they are not really showing the same document. The previewer
is still showing what was the output from the last time
that you updated it. If you've typed anything into the
editor since then, it is not reflected in the previewer;
those changes won't show in the previewer until the
next time you click "save" and
run the compiler. Still, you can update frequently
and quickly, so this
arrangement gives you nearly
the same convenience
as a WYSIWYG word-processor.
A tip about cross-references.
You should never, ever, ever type
into your text something like
"see section 7.3". Instead, you should
always use automatic sectioning commands.
Immediately after the beginning of section 7.3,
you should type something like
"\label{intro.crossed.alephs}".
That won't show up in the output (i.e., in
the dvi or pdf file). But then later you
can type "see section \ref{intro.crossed.alephs}", and
it will print "see section 7.3" in your
output (dvi or pdf file).
The advantage of this system, of course, is
that later if you rearrange the order
of material and your old
section 7.3 becomes section 7.2 or 7.4,
the cross-reference to that section is automatically
updated. It also has a further advantage: It
gets a link when you use hyperref (discussed a few
paragraphs later from here).
To work this, you have to run latex twice.
That's because each time you run
latex, it copies all sorts of information into
a new "aux" file, including things like the
fact that {intro.crossed.alephs} currently
means 7.3. On the other hand, latex
uses information from
the old aux file (if there is one).
When you run latex an extra time, the
old and new aux files are the same, and
the cross-referencing works properly.
If you only run latex once, your output
will say something like
"see section ??" -- it will actually display
two questionmarks.
If you want an automatic table of contents in your book, put
\tableofcontents
where you want it to appear. Again, this takes an extra run of latex
to get the files synchronized.
A tip about screen size.
A page of your document probably is taller than your monitor.
You'd like to display, if not an entire page, then at least a large
portion of it at one time. You can gain a little vertical space by
these tactics:
- The Windows taskbar can be moved from its default location along the bottom of the screen, to the left or right side of the screen. (Or, if you prefer, it can be set to auto-hide.)
- If you're using Yap for the previewer, you can drag its toolbar from the default location at the top of the Yap window, to either the left or right edge of that window.
- Again, if you're using Yap, you can turn off its display of the status bar.
- If you're really desperate for a few pixels -- e.g., if the printed area of
your document is just a few pixels taller than the space available -- here is a method for squeezing out
a few more pixels. Right-click on any blank space on the Windows desktop; then go to "Properties" "Appearance" "Advanced".
You can make each of the following items a few pixels thinner
in size: Active Title Bar, Active Window Border,
Inactive Title Bar,
Inactive Window Border,
Menu,
Scrollbar.
Forward and inverse search
This is a specialized feature, available only in some software, but it's such
a big help in the editing cycle that I want to mention it here. If you have
a suitable dvi previewer (such as Yap)
and a suitable shell/editor program
(such as TeXnicCenter) both properly
configured, then you will have
these two capabilities during
the editing cycle:
- Inverse search. You're looking
at the output dvi display, and you see something that
needs fixing. It could take a while to find the corresponding
part of the source file, because (let's be honest about this)
tex is not easy to read; it's a complicated markup language;
there's a lot of notation to wade through.
But the output is much easier to read. So
just double-click your mouse on that part of the dvi
display, and it will automatically send a message to
the shell/editor (i.e., the other program), telling
it what part of the source file to look for. The cursor in the shell/editor will
move to approximately the right location. It's only an
approximate -- within a paragraph or so -- but that's still
a huge help. In fact, this would be a convenience even
if you're working with plain text (i.e., no funny symbols);
it gives you an easy way to synchronize the
positions you're looking at in the two files.
- Forward search.
This goes the other way. You're looking at some
lines in the shell/editor, and you want to see the
corresponding part of the output. Again, wading
through the files manually could take a long time.
But instead, in the
shell/editor, click the mouse
on the line of the source file that you're interested
in, and then click the mouse on the shell/editor's
"show dvi display" button. It will automatically send
a message to the dvi previewer (i.e., the
other program), telling it to display the (approximately)
corresponding part of the output.
How many programs
and filetypes does latex require?
When using Latex, we must distinguish
between the source files and
output documents.
The basic source file
is a text file written in markup
language and edited with a
text editor, as explained earlier.
Typically it is named "myfile.tex"
or "alephs.tex" or "thesis.tex" or
something like that. Actually, there
could be several files involved,
named something like this:
- mainfile.tex (which calls the other files)
- macros.tex
- chapter1.tex
- chapter2.tex
- chapter3.tex
In addition,there may be some files
used for illustrations, such as
"figure1.eps" and 'figure2.eps" and
"commdiag.eps"; these are also
called by the various tex files listed
above.
Then there are a number of different things
you can do with the source file, to get output files:
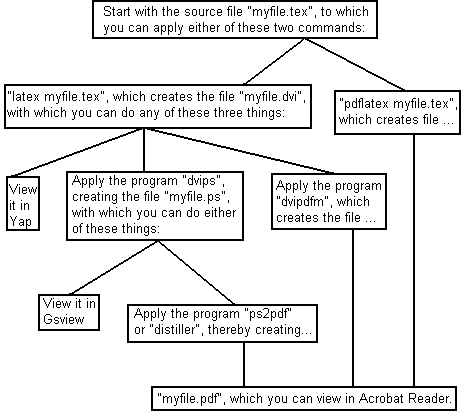
(Caution: The three routes to "myfile.pdf" do not necessarily produce
identical pdf files. The different programs involved may handle the illustrations
a little differently. You should experiment to see
which route to the pdf works best for you.)
So, we have three main kinds of output files: dvi, ps, and pdf.
Which of these three do you actually want?
- Generally I prefer to use the dvi
files while I'm still editing the document, because its
forward and inverse search capabilities facilitate
the editing cycle. More about that later on this page.
However, the dvi file is not really device independent
(despite its name), so I do not recommend using this
format to send out your final finished version of your document.
- Postscript (ps) is right in the middle of
my conversions diagram, partly for historical reasons.
Postscript was introduced by Adobe in 1984, to make good printouts,
and it quickly became a standard. Tex users developed
all sorts of software to go with it, and so it remains fairly
convenient. It is largely device
independent, and it looks good when printed on paper.
- When you're done editing, you can convert
your dvi or ps file to pdf. This format
was introduced in 1992 by Adobe, to create paperless
offices. It looks good both
on paper and on the computer screen, and so this
is the format I recommend for your finished documents.
I think it
may eventually replace postscript, but that may
take a while because so many tools have already
been developed for postscript.
In addition to the compilers, converters, and viewers
shown in the diagram above, you probably will
also want a few other programs -- for instance, a
shell/editor program and a
tex-compatible graphics editor,
both discussed later on this page, or
various other tex-related programs.
Shell programs
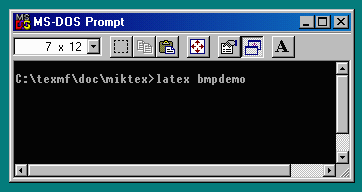
Strictly speaking, you do not need to have a shell program.
You could just type all your tex commands into a Dox box, as shown in
the picture at right. That's the procedure still followed by some old
tex users, who learned tex before shells became available.
In fact, that might be the best procedure for beginners to follow
initially, so that they can understand the basic idea of tex before
they start learning a shell. But I recommend that you switch
to a shell program before long. Learning to use a shell may
take a tiny bit of time and trouble, but over the span of your career
it will save you a tremendous amount of tedium.
(If you really want to continue using Dos boxes,
I suggest that you at least
install the "Command Prompt Here" program from the
Windows Powertoys collection.)
A shell program, also known as a front end or as
a GUI (graphical user interface) for tex, is a text editor
with other features added that make tex-related activities easier.
Following are descriptions of some of those features.
Pictured at right is TeXnicCenter (with the picture edited
to fit better on this web page); it has all the features listed
below.
Many recent shell programs
have syntax coloring/highlighting.
This means that different parts of your file are
automatically displayed
in different colors.
For instance, in TeXnicCenter the default color scheme is
normal text in black,
keywords in blue,
comments in gray,
operators in red,
verbatim in magenta,
text in math mode in green,
keywords in math mode in darker blue.
These colors make the
editing easier. For instance, if you forget to close a math formula with
a second dollar sign, you'll have many lines in one color on the screen;
that makes it easy to spot such errors. The colors are only in the editing
display, not in the text file that you actually save and use.
Most shell programs have
macro buttons for frequently typed
tex commands.
For instance, there may be a button
with a picture of the Greek letter
gamma. If you click on that button, the program will
automatically insert "\gamma"
into your text, at the
current location of your text cursor. A shell program
may have many buttons like that, for all the Greek letters and
most of the mathematical symbols that tex knows.
Some shell programs also have macro buttons for creating
arrays and other complicated displays.
Also important are execute buttons.
For instance, you certainly want a button labeled
"tex" or "latex". Clicking on that button should launch
the tex or latex program, applying it to the tex file that
is currently displayed in the editor section
of your shell program; perhaps it will even
save the file before launching the tex program.
Likewise, you may have
buttons for "make pdf file", "make ps file", "update
index", etc. Of course, with many shell programs
the buttons are labeled with icon pictures instead
of text labels.
A good shell program should be compatible with Yap's
forward and inverse search feature. This is a luxury to
which I have become addicted; I would prefer not to latex
without it.
For programs that do not
have this feature specifically built in, what it
requires is that
- When an appropriate button on the shell
program is clicked, it should be able to send to the
operating system this command: "
yap -1 -s
[linenumber of cursor's current position in current file in shell
program] [filename of current file] [filename of current project,
minus the 'tex'].dvi
"
- The shell program should be capable of
responding to a command line option that not only
tells the program to open on a specified file, but also open at a
specified line number in that file. Ideally, there should also be an
option so that if one instance of the shell program is already running,
it will be used, rather than opening a new instance. (The
precise syntax of this command line is determined by the
particular shell, and thus
may vary from one shell to another.)
 A few recent shell programs have features built in to
automatically facilitate error handling.
For instance, in TeXnicCenter, after you've compiled
your latest version of your source file, click on the
"go to next error" button. The error message produced
by latex will be displayed in the output panel at
the bottom of the window,
and the cursor in the editing panel will be moved
to the location where the error occurred in the source
file. If you're still not sure what the error is, click on
the "view latest build output" button, and (if you
have forward search configured correctly) up will
pop a display of your output dvi file, showing approximately
where the error occurs. Now go to the editing panel
and make whatever you think is the correction to your
error. After you've done that, you can compile again
-- or, if you want to look at several errors per
compilation run,
click again on the "go to next error" button.
A few recent shell programs have features built in to
automatically facilitate error handling.
For instance, in TeXnicCenter, after you've compiled
your latest version of your source file, click on the
"go to next error" button. The error message produced
by latex will be displayed in the output panel at
the bottom of the window,
and the cursor in the editing panel will be moved
to the location where the error occurred in the source
file. If you're still not sure what the error is, click on
the "view latest build output" button, and (if you
have forward search configured correctly) up will
pop a display of your output dvi file, showing approximately
where the error occurs. Now go to the editing panel
and make whatever you think is the correction to your
error. After you've done that, you can compile again
-- or, if you want to look at several errors per
compilation run,
click again on the "go to next error" button.
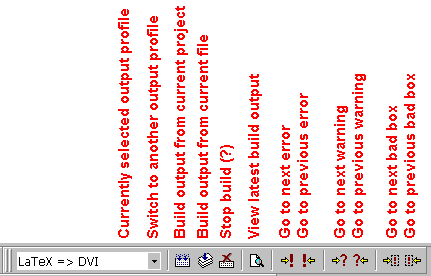
The picture at right shows the "latex toolbar" in
TeXnic Center. (The red explanations were added to the picture
by me, and do not actually show up in TeXnic Center,
though a similar "tooltip" shows up if you hold the mouse
cursor fixed over one button for a few seconds.)
The pull-down menu at left indicates whether
the output will be DVI, PDF, PS, or some other arrangement;
you can add more options to that list.
You can choose whether to execute latex on just one file
or an entire project -- the project system is recommended
when you have several files (e.g., one per chapter), because
the project system works well with forward search even
for multifile documents. The last 6 buttons in the toolbar are
for different kinds of interactive error handling.
Some shell programs don't have all the buttons you'd like,
but some shell programs enable you to add your own buttons
without too much difficulty. For instance, in TeXnicCenter, you
can add commands of your own choosing to a pull-down
"tools" menu. (Adding graphical icons to the items on that
menu is possible but in some cases difficult.)
Also, if you prefer a
shell program that lacks tex macro buttons, you can use
it together with the "Tex
Macros" program;
it can add some (but not all) of the buttons described above.
Documentclasses, styles, and packages
Here is an extremely short example of a latex source file:
\documentclass[12pt]{book}

\usepackage{color}

\begin{document}

This sentences uses {\color{red}red}

and {\color{blue}blue}.

\end{document}
Every Latex document must begin with a \documentclass{ } specification.
The section between there and the \begin{document}
is commonly called the preamble; in that section you can put package calls,
define macros, etc.
The most
common, standard, "official" classes are book,
report, article,
letter, and proc (for proceedings). But
individual users of Latex have devised their own document classes, many
of which can be downloaded for free from the internet. For instance,
- Several documentclasses have been developed for preparing
dynamic presentation slides (i.e., for display at
the front of a classroom or seminar room). Two of the most
popular are
prosper and
beamer.
See also discussions by
Tex-faq and Michael Wiedmann.
- The memoir class, created by Peter Wilson, is an improved version of the
book class. It systematically incorporates the most
popular features that people have been adding to the book class
as packages; thus most people will find it easier to use than book class.
The manual that comes with the memoir class is fairly long.
- The KOMA package contains several documentclasses:
scrartcl,
scrreprt,
scrbook,
and
scrlettr
intended as improvements on
article,
report,
book,
letter respectively.
A document class can be modified by various styles and options. For instance,
in the little example above,
- The book class is called with an option to use characters in 12-point size. (The default size is 10 point.)
- The package "color" calls the file "color.sty," which enables text to be printed in colors.
A package is an organized collection of files, usually including one or more style or class files.
A package is installed if it is present in your computer system (and if your latex program knows where to
find it); a package is used if you call it with a \usepackage
command in your source file.
Again, there are some standard packages installed in any distribution of latex, and
there are additional packages that you can download and install yourself.
Be cautioned
that the installing of a package can be complicated -- there may be many files that need to
be put in various different directories, and then you also have to refresh the database that
latex looks at when it is trying to find where its files are. Some distributions can automate
this procedure for you.
That's one of the features that I particularly like about Miktex, the
distribution that I use. All I have to do is (for instance) put "\usepackage{color}"
into my document's preamble (i.e., the section between documentclass and begindocument),
and then run latex. If color isn't already installed, Miktex automatically
will look on the internet, find the
appropriate files, download them, install them, refresh my database, and then resume the
tex processing. This is called "on-the-fly installation".
Here is a list of a few packages and other free add-ons.
This list includes both some that are widely used, and
some that are my own personal
favorites:
- hyperref will automatically put clickable hyperlinks into your dvi file, at all cross-references, index entries, and table of contents entries, thereby greatly enhancing the usefulness of all of those during your editing process. Click on any hyperlink to be taken instantly to the location that is being referred to. For instance, where the dvi file says "see section 7.3", if you click on the "7.3", suddenly you'll be looking at section 7.3.
In addition to the automatically generated hyperlinks, you can also create custom hyperlinks,
using the hyperlink and hypertarget commands. All these links are useful not only in the final PDF, but
also for your own uses while you're editing the document.
- color -- Even if your book or article is to be in black and white
(as most books and articles are), you may still find it helpful to insert colored
temporary notes to yourself, your coauthors,
or anyone else you're working with. With a bit of effort you can mix any color you like,
but red, green,
blue, cyan, magenta,
and yellow
are already predefined (i.e., no effort needed).
- pstricks, epic, eepic add many drawing commands to the rather limited ones
that are provided by default in the latex "picture" environment. For instance, you can
draw circles of any size, not just a few sizes; you can draw ellipses;
you can specify a line segment by the coordinates of its endpoints, not
just by one endpoint and the slope; you can use any slope; etc.
- graphicx -- for inserting picture files into tex, bypassing the "picture" environment altogether.
- dvipdfm -- used as an option in the "book" class, to generate pdf files. Works
well with inserting pictures. Can also be used as a standalone program, to convert dvi files to pdf files. The more
recent extension
dvipdfmx also permits customized page sizes
for your pdf pages even without geometry, which I find particularly desirable
when I'm creating a pdf primarily for viewing on
computer screens, rather than printing on paper.
- longtable, supertabular, stabular -- Any one of these makes it possible for you
to write a latex document in which a table crosses a page break -- i.e., part of the table appears
at the bottom of one page, and the rest appears at the top of the next page. (The default
of ordinary latex does not permit this.)
- fncychap, sectsty, titlesec, and others -- These make it easier to
change the style of section headings. (Some of these capabilities
are already built into the memoir and KOMA classes.)
- floatflt, wrapfig, picins -- Any one of these makesit possible for text to flow
around an illustration (e.g., if the illustration is only an inch wide). (The default of ordinary latex
is that the illustration preempts the entire width of the printed area of the page, resulting
in a lot of blank space if the illustration is narrow.)
- amscls and
amsmath -- These packages add to latex the main features
that used to be part of AMS-TeX.
- makeidx -- Included as part of standard Latex distribution.
If you want your document to have an index:
- Put
\usepackage{makeidx}\makeindex
in your preamble.
- Put
\printindex at the place where you want the index to appear
(customarily at the end of the book).
- Apply the command "makeindex myfile" externally
after each latex run. That is, use the program makeindex.exe, which you'll find
(for instance) in C:\texmf\miktex\bin.
Actually, if you're using a good shell program like TeXnicCenter,
you can get this step performed automatically for you; just include "uses makeindex"
in the options for the project.
Also keep in mind that
indexing, like cross-referencing, takes an extra run of the latex program to get all the
files synchronized.
- Comprehensive LaTeX Symbol List --
this is really just a document, not a program
or macro, but it can be downloaded using the
Miktex package manager, just like any package.
It lists all sorts of symbols that can
be obtained using assorted fonts that you
can add to LaTeX.
- geometry - This package gives fairly robust control over page size
specifications -- e.g., what size is the paper, and where does the text go on it. (Not needed if you are
satisfied with defaults or are only using packages that aren't finicky about page specs.)
- crop can produce crop marks, requested by some publishers. (Works best
with "geometry".)
If there's something you want to do in your document and you don't know how to do it,
adding a package might be the answer. (But first look in your latex documentation, to
see if you can already do it somehow using just latex.)
Here are some places to find out more
about packages:
- A fairly long annotated list of style files can be found at
INRIA.
- The TEX FAQ
is very good; type a word or phrase into its search field. For instance, type "longtable" into
its search field, and you'll not only learn about the "longtable" package, but also about
"supertabular", "stabular", etc.
- If you're using Miktex, its package manager is very good; type a word or phrase into its keyword filter.
Also note that the "properties" that it shows for each package shows where the package installs its
files; among other things, that list tells you where to find the documentation files for the package.
- Google knows all, if you can ask the right question
Fonts and graphics
Both fonts and graphics can be classified into these two main types:
- Bitmapped, also known as "pixelated".
In fonts, typically these are "Type 3 fonts". In graphics, typically
these are files of any of the types BMP, GIF, JPG,
Information is conveyed pixel by pixel
(i.e., dot by dot).
These are adequate for quick and rough work, and perhaps
for the documents you would
give to your students, but they don't look so good if you
change their magnification.
Publishers of articles and books
prefer to avoid this filetype for diagrams or drawings, though it is
probably unavoidable in the case
of photographs.
- Scalable. In fonts, typically these are
"Adobe Type 1 fonts". In graphics,
typically these are SVG (scalable vector graphics) or EPS
(encapsulated postscript).
Information is conveyed in the form of computerized drawing
instructions (e.g., draw a line
of this thickness, from these coordinates to those coordinates). Good quality is
maintained even if the magnification is changed.
Publishers of articles and
books prefer this type of font or illustration.
How can you get just Type 1 fonts? Well, if you use recent latex software, all
the default fonts are already Type 1 fonts. You have to be more careful if you
add to your document some packages that involve other faults beyond the
default ones. -- To check your fonts, load your document into Acrobat Reader
and then press control-D.
How can you get just scalable illustrations? I know of two main methods.
(You can use either or both methods in your document.)
| Getting scalable graphics by the "included graphics files" method |
Getting scalable graphics by the "direct latex use of picture environment" method |
Most mathematicians nowadays prefer this method
-- perhaps partly because they don't know about the software available
for the other method.
And this is certainly the only method available if you want to
use graphics generated by some external program such as
Mathematica.
For this method, include the line
\usepackage{graphics}
or \usepackage{graphicx}
in the preamble of your source file. Then, at the place where
you want your image file "xalephs.eps" (for instance) to appear,
you include a line like
\includegraphics{xalephs.eps}
in your source file. With a longer command you can also do scaling
and/or clipping. Documentation for these packages can be found
in the directory "C:\texmf\doc\latex\graphics"
if you're using Miktex. --- Actually, other filetypes besides
EPS can be used in these commands, but I wouldn't recommend
it. A plain old PS file may cause problems with your publisher because
it must be accompanied by a "bb" (bounding box) file to
give size/position information. And bitmapped graphics files such
as JPG will lose quality when rescaled.
|
This method may be slightly harder
to use, but has the slight advantage that it avoids most
problems with incompatibility (see the cautionary
note above).
Here is a very simple example of this method:
    \begin{picture}(100,60)

    \put(20,10){\vector(2,3){30}}

    \put(30,25){\circle{1}}

    \put(40,50){$\aleph$}

    \end{picture}
Basic commands such as "\vector" and "\circle" are already built
into latex. If you add to your preamble a line such as
\usepackage{epic,eepic}
or \usepackage{pstricks}
you'll get additional commands available, such as "\path",
"\ellipse", "\dashline." Documentation for eepic is in
"C:\texmf\doc\latex\eepic"; documentation
for pstricks doesn't seem to be all in one place.
|
Software for each of these methods can be found in
our free software collection.
Free documentation
Don't rush out to buy a book about tex. You may want one after a while, but
first take a look at some of the extensive documentation available for
free on the internet.
(Some of the documents listed below are also copied onto our department's
CD-ROM
and website, for
the benefit of graduate students with slow or no internet connection.)
- People who want another very short introduction might look at
LaTeX
for Secretaries (How to survive without Microsoft Word), by
Jacek Artymiak. It is another web page,
about 2/3 the length of this one.
- Latex changed significantly around 2001, when
LaTeX 2e was introduced.
Some older users of Latex, who did not keep up with the
major changes, have been unable to take advantage of the
new packages developed since then. They would do well
to at least glance through
LaTeX 2e for authors, a short
(33 page) document that describes the main changes.
But just to get you started, I can tell you one easy but
important change:
Begin your document with "
\documentclass{nameofclasshere}"
instead of "\documenttype{nameoftypehere}".
This tells the latex program that you're going to use the new system,
and so it permits you to use the newer packages (many of which
won't work under the old system).
Following are some
longer documents on latex in general,
suitable for
use as introductory
courses or reference manuals. (I have
restricted this list to documents that
have been updated within the few
years, i.e., ones that follow the rules
of
LaTeX 2e.)
- "The
Not So Short
Introduction to LaTeX 2e",
by Tobias Oetiker et al.,
109 pages, version of August 2001. This may be an idea length for beginners,
and it has been revised and updated over many years
(it used to be called "The Not So Short Introduction to LaTeX 2"), so it's quite a
good choice for your first latex "book".
- A
Simplified Introduction to Latex, by Harvey Greenberg, 146 pages,
version of April 2005.
- Formatting
Information, Peter Flynn's
intro to Latex, 275 pages, March 2005 edition
- Nicola Talbot's
assorted
introductions (2004), including
Portal pages linking to more documentation:
Some noteworthy documents on
special topics:
Where to search for more information: