Math software for Windows
Configuring Some Older TeX Shell Programs
version of
18 June 2005
Configuring and using PFE (Programmers' File Editor)
 For a while I used PFE as my main shell.
PFE is a multipurpose text editor. It was designed
for editing computer programs, but I've found that it works
quite well for TeX. It has many features (I haven't even used
the "record macros" feature yet). I prefer it over Texshell because
it interacts more smoothly with Yap. (However, it does not have
built in tex buttons -- e.g, a button for "alpha", a button for "product,"
etc. If you want those, you'll have to go with Texshell or some
other program designed specifically for Tex.
To use PFE effectively as a text and tex editor, you may want to associate
it with both filetypes, and use the
"%1" trick, as I described in my notes on
"Changing your file associations".
The main thing that a shell program must do is give you some easy
way to launch the tex program, without always having to retype
or remember the appropriate tex command. I like to use PFE for
that purpose because I'm going to have PFE on my desktop anyway,
to edit my source file.
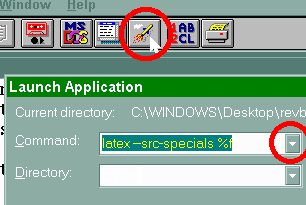
 The simplest way to use PFE for this purpose is with its
"Launch" button, which is labeled with a little picture of a rocketship.
(See first red circle in illustration. That's good with the mouse;
or if your hands are on the keyboard, press shift-F11.) This will bring up a little dialogue box
titled "Launch Application." The first time you use this, you'll have to
type in the two arguments:
- In the "Command:" box, type: latex --src-specials %f
- In the "Directory:" box, type: c:\%d
(That's two dashes before the "src".)
Then click on the "Okay" button (not shown in my illustration) to actually
execute the command. On subsequent uses of this command, you
won't have to retype all of that stuff; when you click on the "Launch" button,
those arguments will already be in the boxes, and you just have to
click on the "Okay" button.
Actually, you can store several different commands in the launch button.
If you want to use a different command, just type it in before you
click the "Okay" button. If you want to use a command that you've
used before, click on the downward-pointing triangle (second red circle in my
illustration) and you'll see a list of all the commands you've used before;
click on the one you want.
Personally, though, I find it convenient to just keep my most frequently
used launch command (i.e., the latex command) in my launch button.
I store my other commands in another place:
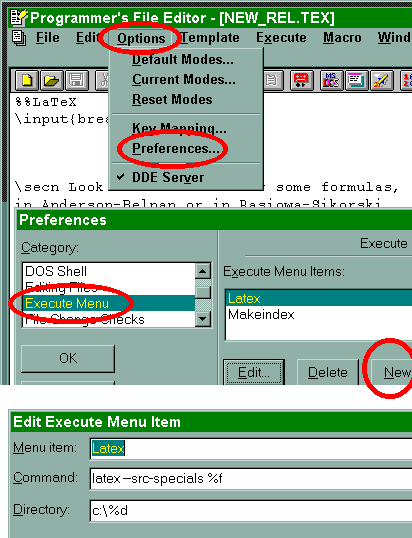
In the menu at the top of the PFE window, click on "Options." Below
that, click on "Preferences." This opens up a dialogue box titled
"Preferences." In its left column, scroll down to "Execute Menu," and click on it.
A list (initially empty) of execution commands, and buttons below them.
Click on the "New" button to add an item to the list, or the "Edit" button
to edit an item you've already put in the list. (Or the "Up" or "Down" button,
not shown in my illustration, to move an item up or down the list if you
want to change the display order.)
 The "New" or "Edit" button will produce yet another dialogue box; my illustration
shows the "Edit" box. There are spaces for "Command" and "Directory", just
like in the launch button's dialogue; but there is also a space for
"Menu item." Type whatever you wish in that box; the name you put there
will appear on display in the menu.
After you've set up one or more items in the list, you're able to
use the menu. Anytime you want to execute one of the commands,
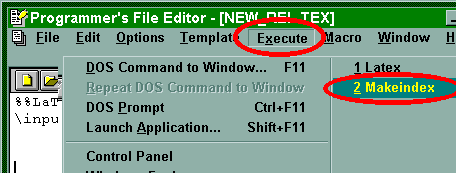
click on the word "Execute" at the top of the PFE window (see first
red circle in illustration). (Or, if your hands are on the keyboard rather
than the mouse, use Alt-X to get the same result.)
That will open up a dialogue box with
lots of options. I don't even know what some of those options do.
But in the right column of that dialogue box is a numbered list of all the things
you've put in the execute menu. Click on one of those to execute
the appropriate command, or press its number if your hands happen to be on the keyboard.
For instance, if I press "2" while that dialogue box is on display, it will
execute my "Makeindex" command.
(This section updated 31 August 2002.)
Here are some of the commands that I have found most useful in my
own work:
| Latex |
latex --src-specials %f |
| Makeindex |
makeindex %n |
| Make PDF |
dvipdfm %n.dvi |
| New Yap |
yap -s %l%n.tex %n.dvi |
| Last Yap |
yap -1 -s %l%n.tex %n.dvi |
| Show log |
C:\Moreapps\Pfedit\pfe32.exe %n.log |
| Plain tex |
tex %f |
| Make Postscript |
dvips %n.dvi |
| LaTeX Macros |
"C:\Program Files\Juan M. Aguirregabiria\LaTeX Macros\LaTeXmac.exe" |
For all of these commands,
the default directory already specified by PFE is
"." (that's a period, which is just barely visible).
The effect is "use the current directory", which
might be what you want. An alternative is
"c:\%d" (without the quote marks), which
means "use the directory containing
the file that you're currently editing".
That longer specification seems to work better
in Windows XP, in my experience.
Note that there are two different "Yap" commands in this list.
Those are for forward search (which only works with one-file documents,
not with the a-file-for-each-chapter documents).
I find it convenient to have both versions in my PFE execute menu.
Using either of them, a copy of Yap will be brought to the screen, and
Yap's "cursor" (a small circle, which doesn't show up when
printing) will be pointing at the line in the dvi display
that corresponds (approximately) to the line where the cursor
currently is in the .tex file that you're editing in PFE.
(Of course, the approximation won't be very good
if you've been editing the .tex file for a while since the
last update of the .dvi file.)
- If you use the "new yap" version, then a new copy of Yap will
be started up, regardless of whether you already had a copy running.
(I sometimes find it useful to simultaneously use two or more copies
of Yap -- to compare two different documents, or to compare two
pages in the same document.)
- If you
use the "last yap" version,
then the copy of Yap
that you acccessed most recently (i.e., last)
will be reused, but with its page and cursor moved.
(If you don't already have a Yap running, then
this command will have the same effect as
the other Yap command --
i.e., it will start up an instance of Yap.)
Note that one copy of Yap can display several
different documents -- one at a time, tiled,
cascaded, or arranged however you wish using the mouse.
(But one copy of Yap will not display two copies
of the same document, so if you want
to look simultaneously at two different pages
in one document, then you must use the "new yap" command.)
Where do you get all those abbreviations?
Well, the phrases "latex", "makeindex", "dvipdfm" are names
of programs that are parts of the Miktex system; I assume
you're using Miktex. The other parts, such as %f, are
abbreviations used by PFE.
In PFE's help subprogram,
search for the phrase "Substituting Current Filename". That will
take you to the help page that lists all the abbreviations. Here are some
of the most important ones:
| %d | Substitutes the name of the directory containing the file. |
| %f | Substitutes the file title of the filename, comprising the filename and extension separated by a "." |
| %n | Substitutes the filename part of the file name; this is the part of the final component before the '.' separator |
and there are many others listed on that help page.
Configuring and using TeXShell
In the default setup,
there is only one "TeX" button, but you can change what it does (plain
TeX, LaTeX, etc.) by going into "Options... Program Calls...". The Help
file tells a little more about that -- just search for "Calling TeX". (Before
you change any of the settings, I recommend that you write down the default
settings.)
Also, you can change the existing buttons or add more buttons
if you wish; look in the help file
under "Speed Buttons". Just use a text editor to edit
the TEXSHELL.INI file which can be found in the same directory as the TeXshell
program itself. (Caution: First make a backup of the file, in case you
mess things up.) Then, the next time you restart the program, your revised
buttons will appear. ... For instance, I relabeled my "TeX" button as "LaTeX",
and then I added these buttons:
- Plain TeX for making a plain .tex file into a
.dvi file,
- Pdf for making pdf files,
- Ps for making postscript files,
- Makeindex for
updating the index in the book that I've been writing.
Here is how I did that:
In the section under "[Buttons]", I changed the existing lines
and added a few more. My TEXSHELL.INI lines for Buttons now read:
LaTeX=<texmain>$LATEX the main file$
Save=<save>$SAVE the edit changes$
Log=<showlog>$Show LOG file$
Preview=<previewmain>$Preview the DVI file$
Plain TeX=<plaintex>$click here to use PLAIN TeX$tex --src-specials %F.tex
Pdf=<pdf>$click here to make a PDF version$dvipdfm %F.dvi
Ps=<ps>$click here to make a POSTSCRIPT version$dvips %F.dvi
Index=<makeindex>$click here to update your INDEX$makeindex %F
In case you're wondering:
In each line, the part before the equals sign is what actually shows on the button.
The part between the two dollar signs is the "tooltip" -- i.e., the text that
displays when you hold your mouse cursor over the button. The part
after the second dollar sign is the command that is actually executed
when you click on the button (though that part can be omitted if the command
is one already defined in TeXShell, such as "texmain"). Those various
commands are calling programs in the miktex \bin directory. (The commands
don't need to include the entire path to those programs, becaue when you
installed Miktex, it made the miktex\bin directory part of your operating
system's default path.)
Because I am using TeXShell, I have now altered my
Windows setup to make it work better with TeXShell. You may
want to do likewise. I've set it up so that, whenever I
right-click on any TeX file in Windows Explorer, one of the
options that comes up in the context menu says "TeXShell" --
but it actually means "open TeXShell with this file as the
main file". That's not hard to do. Follow this procedure:
Start up your Windows Explorer. Then, in the menu at its
top, go to "View ... Folder Options ... File Types." Then
look for TeX files among your document types. (You may have
to look for a while, if the TeX files have gotten named
something else, such as "latex files" or "wintex files".)
Then edit that filetype, and add a new action. Call the
action "TeXShell", and for the application use
C:\Moreapps\texshell\TeXShell.exe /m "%1"
but replacing my "C:\Moreapps ..." with whatever is the path to texshell
on your computer.
If you have any difficulties with your PATH variable, here is one remedy:
Just tell TeXShell where MikTeX is, and then MikTeX doesn't need to be
in your PATH. This is accomplished as follows: On TeXShell's main menu,
under "Options", "Program Calls", make these two alterations.
program
call for |
default valaue |
change it to |
| TeX |
latex --src-specials %F.tex |
C:\TEXMF\MIKTEX\BIN\latex --src-specials %F.tex |
DVI
Previewer |
yap -1 -s %l%f%e "%P%F.dvi" |
C:\TEXMF\MIKTEX\BIN\yap -1 -s %l%f%e "%P%F.dvi" |
Like YAP, TexShell will remember what documents you've been working on.
You should close TeXShell's subwindow for any document that you're done
with; otherwise it will show up and distract you
next time you open TeXShell.
 The simplest way to use PFE for this purpose is with its
"Launch" button, which is labeled with a little picture of a rocketship.
(See first red circle in illustration. That's good with the mouse;
or if your hands are on the keyboard, press shift-F11.) This will bring up a little dialogue box
titled "Launch Application." The first time you use this, you'll have to
type in the two arguments:
 For a while I used PFE as my main shell.
PFE is a multipurpose text editor. It was designed
for editing computer programs, but I've found that it works
quite well for TeX. It has many features (I haven't even used
the "record macros" feature yet). I prefer it over Texshell because
it interacts more smoothly with Yap. (However, it does not have
built in tex buttons -- e.g, a button for "alpha", a button for "product,"
etc. If you want those, you'll have to go with Texshell or some
other program designed specifically for Tex.
 The "New" or "Edit" button will produce yet another dialogue box; my illustration
shows the "Edit" box. There are spaces for "Command" and "Directory", just
like in the launch button's dialogue; but there is also a space for
"Menu item." Type whatever you wish in that box; the name you put there
will appear on display in the menu.