Note added 30 June 2004: I'll probably revise this whole page
soon. I'm finally starting to understand the EPS approach and
its chief advantage: EPS files are vector-graphics based, so
they look good even when rescaled. That's important for most
publications. The method below, with BMP files, is pixel-based,
so the pictures look bad when you rescale them.
Quick and Rough Pictures in Latex
by Eric Schechter - -
version of
9 Feb 2004
LaTeX has a few of its own built-in graphics commands -- for drawing
lines, circles, etc. -- but they
are cumbersome and not very powerful. Alternatively,
you can create a graphic image with some other
program, and then insert it into your tex files; that's
the topic of this page.
There are really two different needs to be met here:
- I want to see my pictures in my document while I'm
creating and editing the document.
I prefer to use
Yap for my previewer during editing, because it has such great
forward and inverse search capabilities, and because
it runs much faster than Acrobat Reader (particularly
on old, slow computers). This forces
me to use certain filetypes -- apparently, DVI for the
output file, and BMP for the pictures.
- I want the same pictures arranged in the
same way, in the
finished document that I distribute to colleagues.
I prefer to use PDF files
for my output, because they are largely device independent
(unlike TEX or DVI files) and because they look good
on paper or on computer screen (unlike PS files, which
generally only look good on paper). This forces the use
of certain other filetypes. I have had good results using
DVIPDFM.EXE and either JPG or PNG files, as outlined below,
but there may be other good methods that I haven't explored
yet. Admittedly, this requires a conversion
between BMP and PNG, but that's fairly easy, as indicated
below.
The TeX distribution that I'm using is Miktex. I
believe the method outlined below will work with any flavor
of Microsoft Windows, but I've mainly tested it in Windows
98. (Other methods, less familiar to me, may also work for
tex graphics. In particular, PDFLATEX.EXE and EPS files are
widely used; perhaps I'll add an explanation of those to
this web page at some later date.) I welcome your suggestions
about this web page.
Before you begin, you may want to install some of the free programs
mentioned below.
Now here are the steps:
- GENERATE THE IMAGE. For this purpose you can use
any Windows program whatsoever -- it doesn't have to be a
graphics program or even a program that is designed to
generate a graphics image. You just need to be able to see
the image on your computer screen.
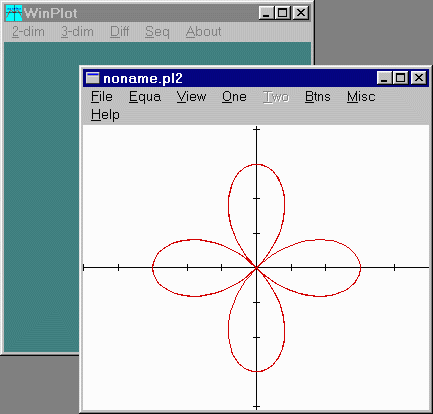
For instance, when I teach calculus, I sometimes make illustrations
using a free, very simple program called WinPlot (see sample picture).
More recently, I've begun learning to use a more complicated (but also
free) program called GraphCalc. See my list of selected free math software.
There may be better programs available -- certainly Mathematica is
more powerful -- but my point here is that you can use any
program.
Another program that I use for some of my illustrations is Paint,
which comes with Microsoft Windows. You start it up with "Start",
"Programs", "Accessories", "Paint". If you study the help file that
came with Paint, you'll find that it can do a fair amount.

If you're planning an image for a Tex file, though, you want to keep these
things in mind:
- Color mass-production is still very expensive,
so if the destination of your file is a customary paper
printout, then you're going to want it in black-and-white.
Will your picture look good that way? (If you can display
the image in black-and-white, so much the better.)
... On the other hand, if the file is intended just to create
a PDF, or if it is intended for overhead transparencies,
then
COLOR
is permitted and will work fine in your images.
- And, what size
do you really want the picture to be?
Of course, some experimentation will answer these
questions for you.
- CAPTURE THE IMAGE.
(You can skip this step if you created your image using a program that
can save graphics files in some common format.
For instance, if you create your image using Paint,
then just save the image as a BMP file. If you create your image using
some program that can save picture files but not as BMP's, then use
Irfan View -- described below -- to convert the picture to a BMP.)
This step involves a few substeps:
- First, while the image you want is displayed on the screen,
press the "Print Screen" key. That's a key on your keyboard that
probably says something like "Prnt Scrn". Its location may
vary from one keyboard to another, but on most keyboards
it's in the top row of keys.
- Now start up some graphics program. Almost any graphics program at
all will do. One program that I often use for this prupose is Irfan
View, because it's free (see my list of selected free graphics
programs) and because it can also handle some of the next few
steps well.
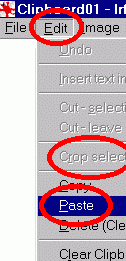
- In the graphics program, go to "Edit" (in the top row of the screen), "Paste".
(See illustration at left.)
That will paste a picture of your screen-shot into the graphics program.
- Your illustration is a lot bigger than what you want. So now use the
mouse cursor to select a rectangle on the screen; then go to
"Edit", "Crop" to reduce the picture to just that rectangle. (Not all
graphics programs have the crop command, but Irfan View does.
You can also crop "manually" with Windows Paint, but that's a more
tedious procedure: Select the rectangle you want, copy it,
open a new instance of Windows Paint, and use "paste" to insert
the desired rectangle.)
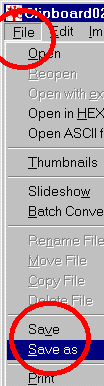
- Now go to "File", "Save as". (See illustration at right.
Do not confuse it with "Save".) The "Save as" command lets you
save your picture as a file. Irfan has the advantage that it offers
many different filetypes.
--
At this point I would recommend saving the file as a Windows "BMP"
file. Later we'll want to convert it to something else.
- TOUCH UP THE IMAGE. Use Paint or other graphics
programs to make any desired changes in the image. And you'll
probably want to convert it to black-and-white, too.
- Note the dimensions of the image,
in inches or centimeters. Here is one way to
do that: Open up the image in Paint (for instance) and go to
"Image" "Attributes".
- GET THE IMAGE INTO YOUR DVI FILE.
Put the image file in the same directory as your tex file, and
issue your "latex" command from within that directory.
The previewer "Yap.exe" will display the BMP file within your
DVI display, if you have altered your Tex file as follows:
- Change the first three lines of your file so that
they look something like this:
\documentclass[12pt]{book}\newcommand{\pix}{bmp}% for
dvi


%\documentclass[12pt,dvipdfm]{book}\newcommand{\pix}{jpg}% for pdf

\usepackage{graphicx}\DeclareGraphicsRule{.bmp}{bmp}{}{}
The second line is commented out. This makes it
easy to switch back and forth between two settings,
as needed. ...
You could use some document class other than "book", and you don't need to have
12pt among your options, and you could have some other options too.
Also, instead of jpg you could use png; that is explained
in a later step, below.
(If you're going to be switching back and forth fairly often, an easier
method is outlined at the bottom of this web page.)
- Then, later in your file, at each place where you want an image to
appear, include a line something like this:
\includegraphics[width=9.14cm,height=8.73cm]{winplot.\pix}
Of course, you use your own measurements and filename. If you use inches,
replace "cm" with "in".
... You can modify the "includegraphics" line in some ways that
will affect positioning.
For instance, if your "includegraphics" line is
preceded with \begin{center}
and followed by \end{center}
then your image will be horizontally centered -- i.e., there will be
as much space to the left of your image as to the right of it.
- VIEW THE DVI FILE; EDIT THE TEX FILE.
Run Latex to create or update your dvi file.
View it with Yap. You'll be able to see the
pictures (i.e., the BMP's). Edit the TEX file
to make whatever changes you'd like. Run Latex
again, to update the dvi file; view it again
with Yap. etc.
| We still want to make a PDF file.
Dvi and bmp files are convenient for editing, because they load quickly into
Yap. But dvi files are not recommended for sending to other people,
because the dvi file is not really device independent (despite its
name). The dvi file relies on font information that may vary from
one computer to another; not all tex installations will display
a dvi file in the same way. Postscript (ps) and Acrobat (pdf) files
are much more portable -- i.e., they will print essentially the
same from any computer. I prefer pdf files, because they
also look good on the display screen of any computer
(Postscript was only designed for printing, not for
the paperless office.) So when I'm done editing, I produce
a PDF version of my finished document. |
- CONVERT THE IMAGE TO JPG OR PNG.
The BMP file worked fine in YAP, but it won't insert so easily
into a PDF file. We need to convert it. Two of the formats
that will work are JPG and PNG. I'll do my explanation with
JPG, but everything works just the same way with PNG.
Take your pick -- either of
those formats seems to work equally well. Actually, each has
minor advantages:
- Most of my PNG files seem to be smaller than the corresponding
JPG files. I don't know whether that is always the case. If it is, you
may prefer files that take up less space on your hard disk. Presumably
they also load a little faster, though I doubt that you'll notice
the milliseconds saved.
- PNG is a more recent format; JPG has been around for several years
more. Consequently, you'll find JPG recognized by more graphics editor
programs. For instance, later versions of Windows Paint can handle JPG.
(Both formats are recognized by Irfan View, my favorite
free graphics program.)
So, how do we convert it?
Open the BMP file in some
graphics program such as Irfan View (mentioned earlier),
and then use the "File", "Save as" command, you can save
it as a JPG file.
- CREATE BOUNDING BOXES.
This step is actually optional, so if you find it confusing,
just skip it. If you omit this step, you'll get some error
messages during one of the later steps, but they
are harmless error messages and can be ignored;
you'll still end up with the same PDF file.
(Personally, I prefer not to get into a habit of
ignoring some error messages, because then
I might accidentally ignore others that should
not be ignored.)
In the Miktex bin directory, there is a program
called "ebb.exe", which we apply to the JPG (or PNG) files
to make "bounding box" files. For instance, if you have
a picture named "mypic.jpg", you would want to apply
the command "ebb mypic.jpg". This will create a file
named "mypic.bb" in the same directory. That file does not replace
the picture file, but it supplies information about the
picture's dimensions to dvipdfm, which doesn't know how
to get that information directly from the picture file.
If you're going to do this many times, you may want
to build the command into your Windows interace, to simplify
your work. Create a new file association, as explained at tips_install.htm#associate.
You can set things up so that when you right-click on any JPG (or PNG) file icon,
one of the commands offered on the resulting menu is "bounding box".
The application line should be:
"C:\Program Files\MiKTeX\miktex\bin\ebb.exe" "%1"
(Modify that line if your bin directory is located elsewhere on your hard disk.)
- MODIFY THE TEX FILE.
Move the "%" sign that I told you to put at the top of your
file. Now it will look like this:
%\documentclass[12pt]{book}\newcommand{\pix}{bmp}% for dvi
\documentclass[12pt,dvipdfm]{book}\newcommand{\pix}{jpg}% for pdf
- Optional. At this point you may want to
make a backup copy of your DVI file and store it in some other
directory; reasons for that will be made clear in a later step.
-
Run the Latex program again, to create a new version of the
DVI file.
If you did not create bounding boxes correctly, at this point
you will get some error messages about the images. Just
ignore the error messages. Sorry, I know they're annoying, but they're
harmless.
Don't bother loading the new DVI file into Yap -- it won't show the images.
- Now run the program "dvipdfm".
(Presumably you have a button on your tex shell program that will take
care of this for you.) For instance, to turn my "sample.dvi" file
into a "sample.pdf" file, I would use this command:
dvipdfm sample.dvi
issued from a command prompt inside the directory that contains the
files. This will create a PDF file
that includes your images. We're all done.
-
Optional. Now would be a good time to restore your DVI file to
its earlier form, so that it will have pictures the next time you look
at it in Yap, should the need arise at some later time. You can
restore it either by moving the backup copy back into your document
directory, or by changing the TEX file back to the "bmp/dvi" form and
running Latex one more time. This restoration will not affect the PDF
file.
- You can repeat this procedure, as needed -- i.e.,
if you have some afterthoughts and want to alter your document. Each
time you run Latex, it will overwrite the DVI file with a new copy of
the DVI file. The new copy will either be one that displays pictures
in Yap or one that is ready to produce PDF files, according to which
way you have the "\pix" command defined. Each time you run Dvipdfm,
it will overwrite the PDF file with a new copy based on the most
recently written version of the DVI file. (However,
dvipdfm will not create the new DVI file if the old one is
currently loaded in Acrobat Reader, so you'll need to close
that first.)
Of related interest: The package "picins" works well for
making text flow around a picture. It is compatible with
the picture procedure outlined above. Here is a typical
usage: In your preamble (i.e., between "\documentclass"
and "\begin{document}"), include the line
\usepackage{picins}
Then, at the place where you want to insert the picture,
include a line like
\parpic[sr][r]{\includegraphics[width=1.19in,height=1.18in]{mypic.\pix}}
At the right you can see my picture ...
The syntax being used here is
\parpic(width,height)(x-offset,y-offset)[Options][Position]{Picture}
Paragraph text....
where the parts in red are optional (and most are omitted in my example
in the preceding line). The default settings (obtained when the
optional parts are omitted) will have the picture on the left
and the text on the right.
The picins package is by Joachim Bleser, and the
lengthy documentation included in the package is in German.
However, a brief description in English (including a list
of the optional settings) has been supplied
by Piet van Oostrum; it can be found separately
in Tex repositories such as
Dante.
If you're going to be switching back and forth fairly often between
the yap-viewable dvi format and the pdf-preparation format, here is
a procedure that makes the switching easier (though it takes a little
longer to set up, initially):
- Create a directory where you will keep some auxiliary files. To avoid
some possible difficulties, I suspect you may want to use a short filename.
I used "
C:\Moreapps\Texmods\", but you can use some other directory
if you wish.
- Within that directory, create a couple more subdirectories. Give
them different names, preferably names that suggest what they're for. I
named my subdirectories
prep4pdf and
prep4yap.
- In each of those directories, create a short tex file. Those two tex files
should have the same name. I named mine both
texprep.tex. Here is what I put in them:
- In the file
C:\Moreapps\Texmods\prep4pdf\texprep.tex, I wrote
\documentclass[12pt,dvipdfm]{book}

\newcommand{\pix}{png}
- In the file
C:\Moreapps\Texmods\prep4yap\texprep.tex, I wrote
\documentclass[12pt]{book}

\newcommand{\pix}{bmp}
- Begin your main document with the line
\input{texprep.tex}
instead of lines about documentclass and \pix.
- Create two new buttons in your tex shell program (or two new Build Output
Profiles, if you're using TeXnic Center for your shell).
- One button or profile should be labeled "create dvi file viewable by Yap", or
something like that. Its main executable command should be
latex.exe -include-directory="C:\Moreapps\Texmods\prep4yap" --src [filename]
or something like that, where [filename] is replaced by whatever your Tex shell
program uses as an abbreviation for the current Tex file.
- The other button or profile should be labeled "create dvi file to be used by
dvipdfm", or something like that. Its main executable command should be
latex.exe -include-directory="C:\Moreapps\Texmods\prep4pdf" --src [filename]
or something like that.
- Now clicking on one button or the other will create the appropriate type
of dvi file.